
Hi Everyone,
I just wanted to send you all a friendly reminder that you signed up for the Museum Imaginary Play center. This is by far my favorite center and it is a VERY hand on center so get ready for some fun! Listed below are your fellow committee members
Group Coordinator: Person A (Class)
It is the Group Coordinators job is to delegate jobs to everyone else. To make sure that everyone is helping as necessary. To keep up with communications between group members as well as to make sure that when collecting donations that everyone knows where to go so that everyone doesn’t go to the same exact store. The Group Coordinator must also keep track of all items needed and collected so that they can ensure the Imaginary Play area has all that is needed. The group coordinator is also responsible for setting up a date where everyone can get together to create the Imaginary Play theme and also to decide who will be helping with clean up.
I know it sounds like a lot but don’t worry I am always here to help and I am more than happy to do so.
*Here is an idea for delegation you change the job description or needs as necessary
* Everyone helps with setup and takedown
Members: Person B (Class) Collect Donations and specific items
Person C (Class) Collect Donations and specific items
Person D (Class) Collect Donations and specific items
Person E (Class) Create Something Specific
Person F (Class) Create Something Specific
You will be responsible for setting up AND taking down this center. The setup date will be ---- and the take down date will be---- If you are unavailable it is YOUR responsibility to trade with someone from another month.
The School/ teacher Barbara has the Following:
• Some bones, fossils etc
• Plastic bugs
• Sea shells
• Plastic Dinosaurs
• Magnifying glasses
• Kaleidoscopes
You will need to Create, Collect, or get donations for the following:
Be sure to check out my Pinterest board for great ideas of other things to make http://www.pinterest.com/familylicious/discovery-exploration/ • We need some chicken bones preferably a whole chicken use hydrogen peroxide to bleach the bones.
• Lizard if anyone can catch a lizard I have a tank and everything we will need to keep it happy for a month. Go to a Pet store ask for a donation most large Pet stores like Petco and Petsmart have adoption animals especially reptiles so go and ask.
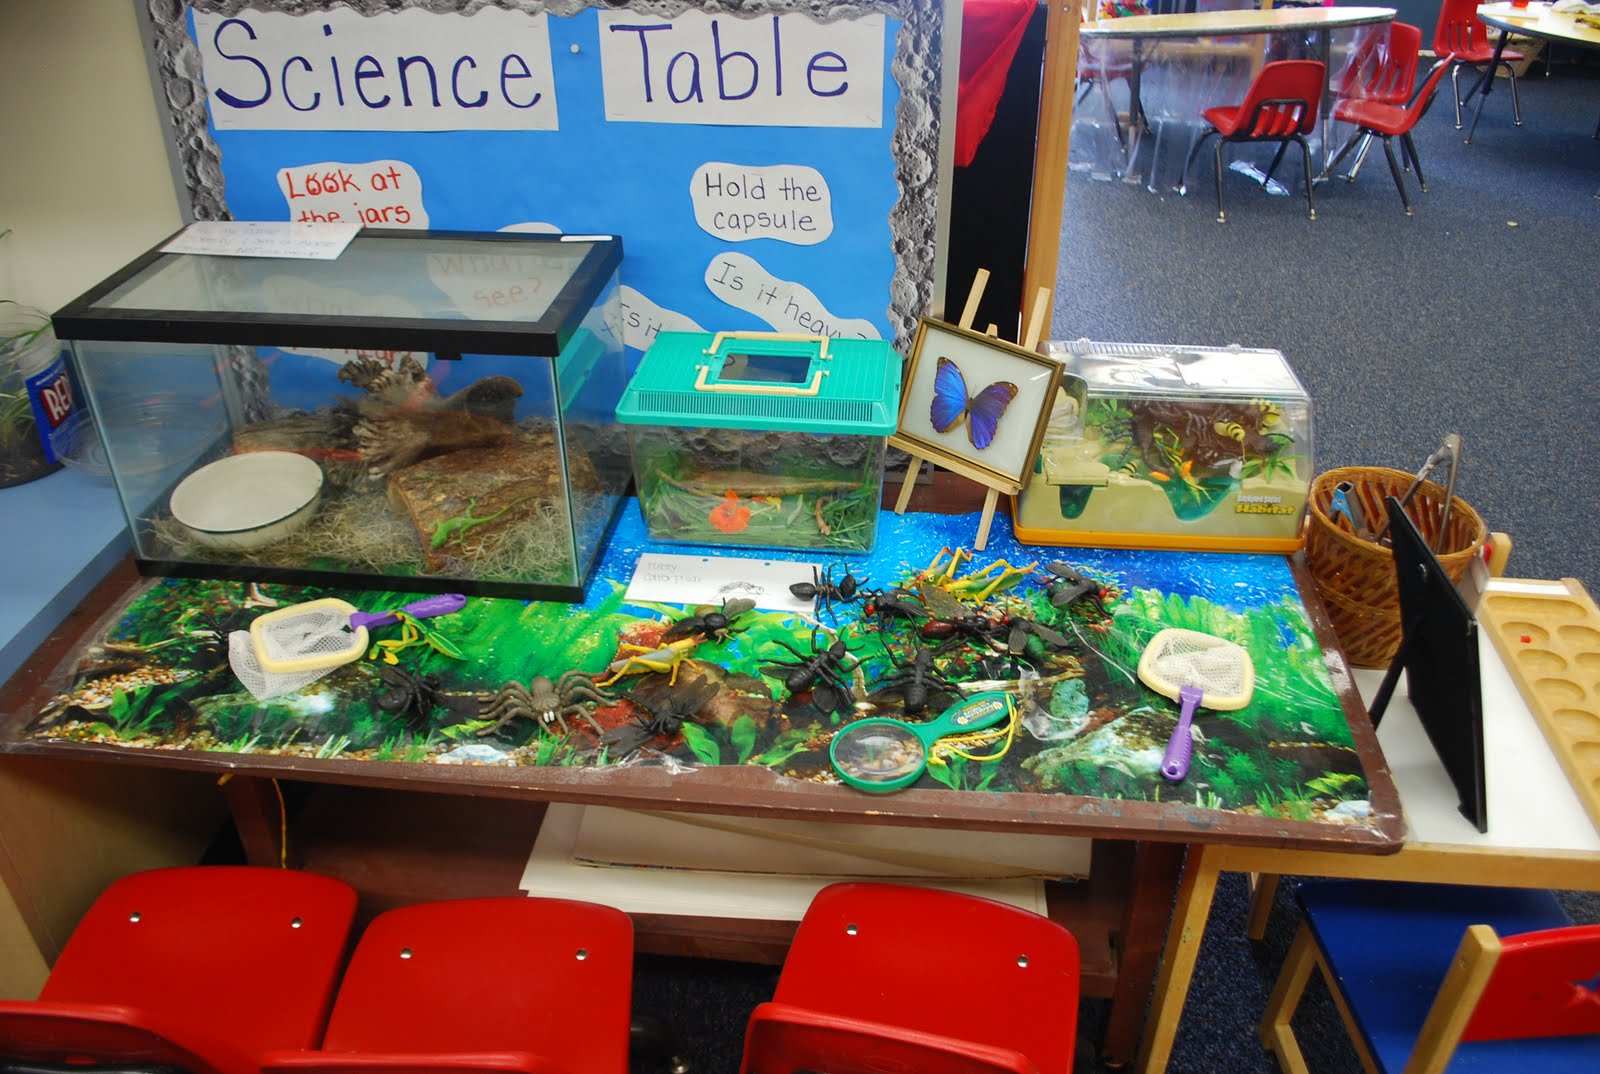
• Dinosaur Eggs and Geodes go here for instructions on how to make Dinosaur Eggs and Geodes


• Instead of doing plastic bins I thought we should make it more like a real museum with displays so make display trays [picture frame take out glass use back board cover in felt and put back in frame] for all the "exhibits" they are really cute and the kids can take the trays out play with them and easily put them back.

• Under the stairs we will have a planetarium use fabric to darken the area we need to figure out how we are going to hang it use a planet light that will cast stars and other fabric that will be in this area as well. Since the light thing will be casting the light I was thinking it would be fun if we also hung CD's from the ceiling area under the stairs the light will cast a rainbow effect which could be pretty cool.
• Fabric that will cover all the turned over furniture I am trying to think of more display area space because we may need it. So if you have any ideas that would be great.

You can see above how I covered the table with fabric so it looks like a nice display not an overturned table
• I have donated a tiered tower which we are now calling the Sensory Tower.

We will have Science Bottles

Feelie Gloves

Sound Jars

Smell Jars

• Sensory Baggies

• Rainbow Stew Baggies
 and anything else super sensory oriented.
Click on any of the Sensory item pictures above or on their link titles for detailed instructions on how to make them and find some great ideas.
• For the OBJECTS for display trays that we made I was hoping to go for a nature theme. Use fossils, shells, arrowheads, rocks etc add any ideas and items you might have.

• EVERYONE BRING CULTURAL ARTIFACTS YOU ARE COMFORTABLE WITH THE KIDS TOUCHING AND PLAYING WITH
• We will have baskets on the bottom row which will have rocks, drift wood, dried flowers, silk flowers, and some different textured materials and some pinecones. GET DONATIONS FROM CRAFT STORES AND WALMART AND COLLECT WHAT YOU CAN

Silk flowers

Drift Wood

Pine Cones
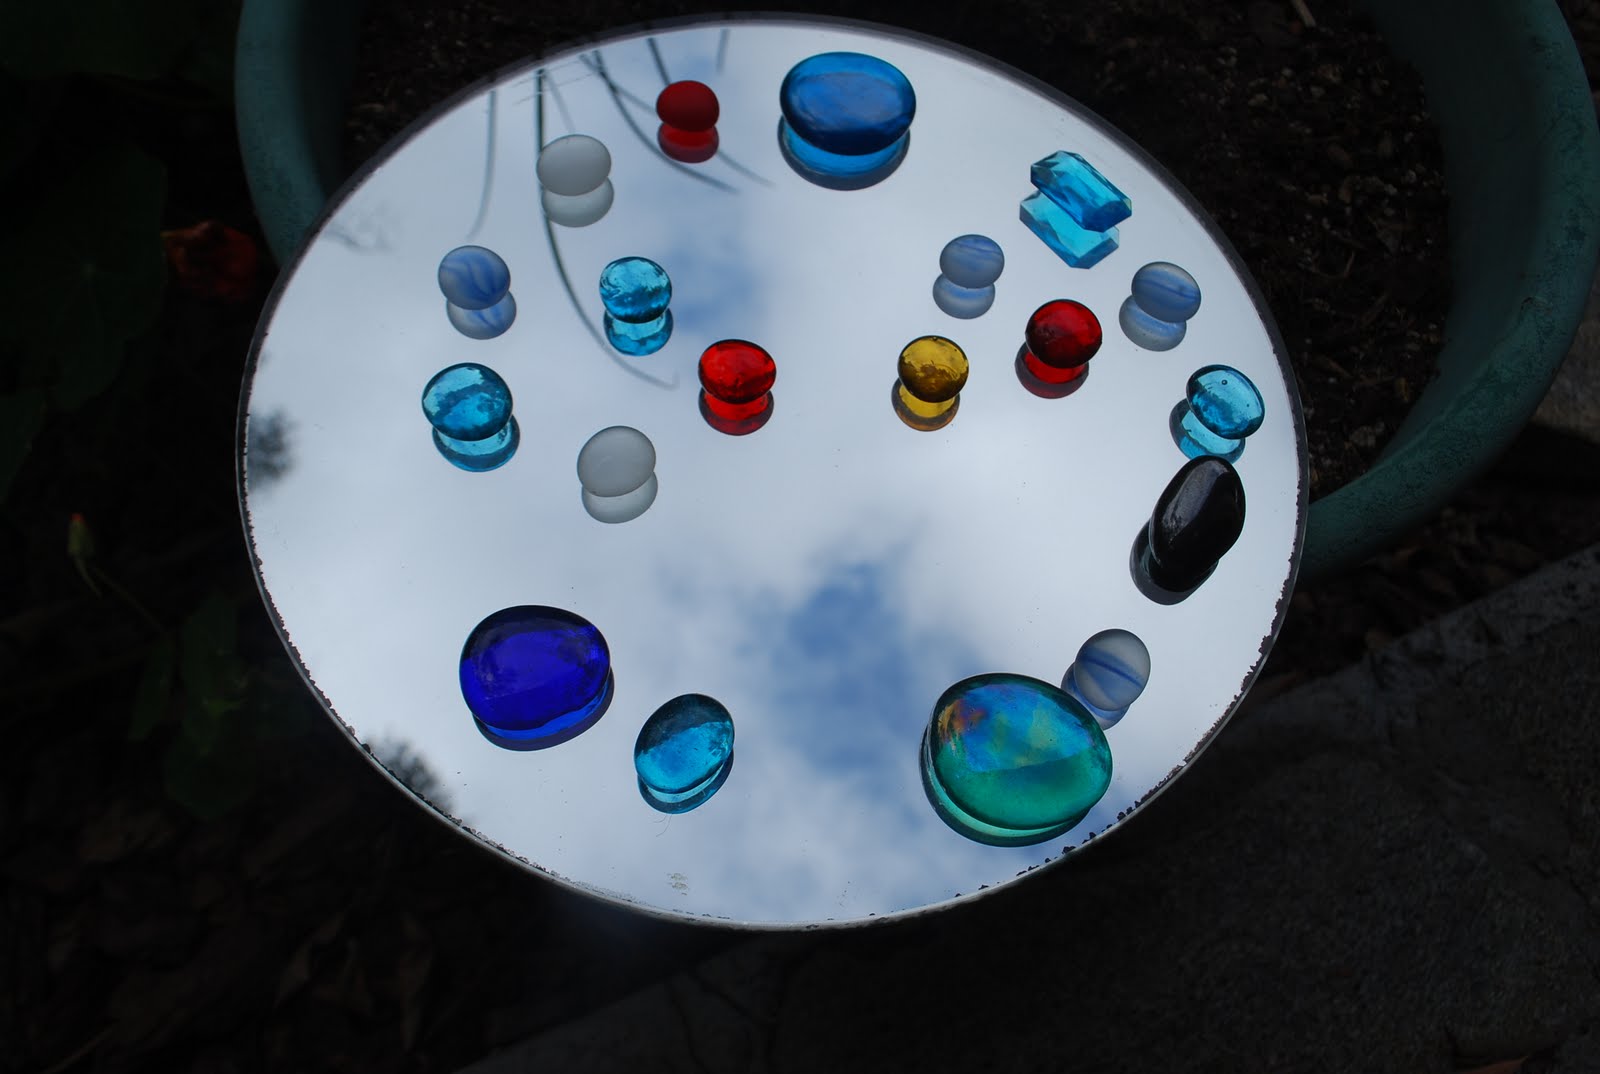
• Use a framed mirror that lays flat and some Crystals and glass stones to put on it I would like to have flashlights near this so the kids can look through the crystals with some flashlights. I know we can find some at the 99 cent store but if you have any cheapy small flashlights [EVERYONE TRY AND BRING ONE] that would be great I was thinking if we could have four that would be more than enough.

• Try to catch a caterpillar and other real bugs maybe a plant (African violet) in a two liter bottle so you can see the roots growing you can throw some worms in there to. Set up life cycle.

• I have setup for tadpole ---FIND TADPOLE [Volunteer]
• I also thought it would be fun if was had a weekly science experiment going on on top of the shelves I was thinking we could do colored flowers. By taking 3 or 4 white carnations and putting them in water with food coloring they will change color we could even split the stem of one and stick it in two different colors to see how the flower will change. I was also thinking of making a dinosaur egg another week by sticking a hardboiled egg in vinegar (it turns all leathery). Those we can change out on Mondays. [ Monday people- volunteers]
• We also wanted to do a Hidden Object/ Sensory Box. Kind of like the Ned's Head game. Where we will have objects in a box the kids can stick their hands in and try and guess what the object is. CHECK SCHOOL FOR OBJECTS WE CAN USE IN SENSORY BOX. Click HERE to see how to make a Hidden Object Box. [ any volunteers]
 You can see the Sensory box in the corner. We also gathered items from around the room and put them in a basket next to it so the kids could easily play with it
• I donated a Pheasant (it was real once) put it on display [EVERYONE PLEASE BRING THINGS THAT YOU ARE COMFORTABLE WITH THE KIDS PLAYING WITH]

• Sensory tub filled with bones paint brushes and sand
• magnifying glass on each board
• Journal area- basket of paper and pencils/ crayons children can record their findings

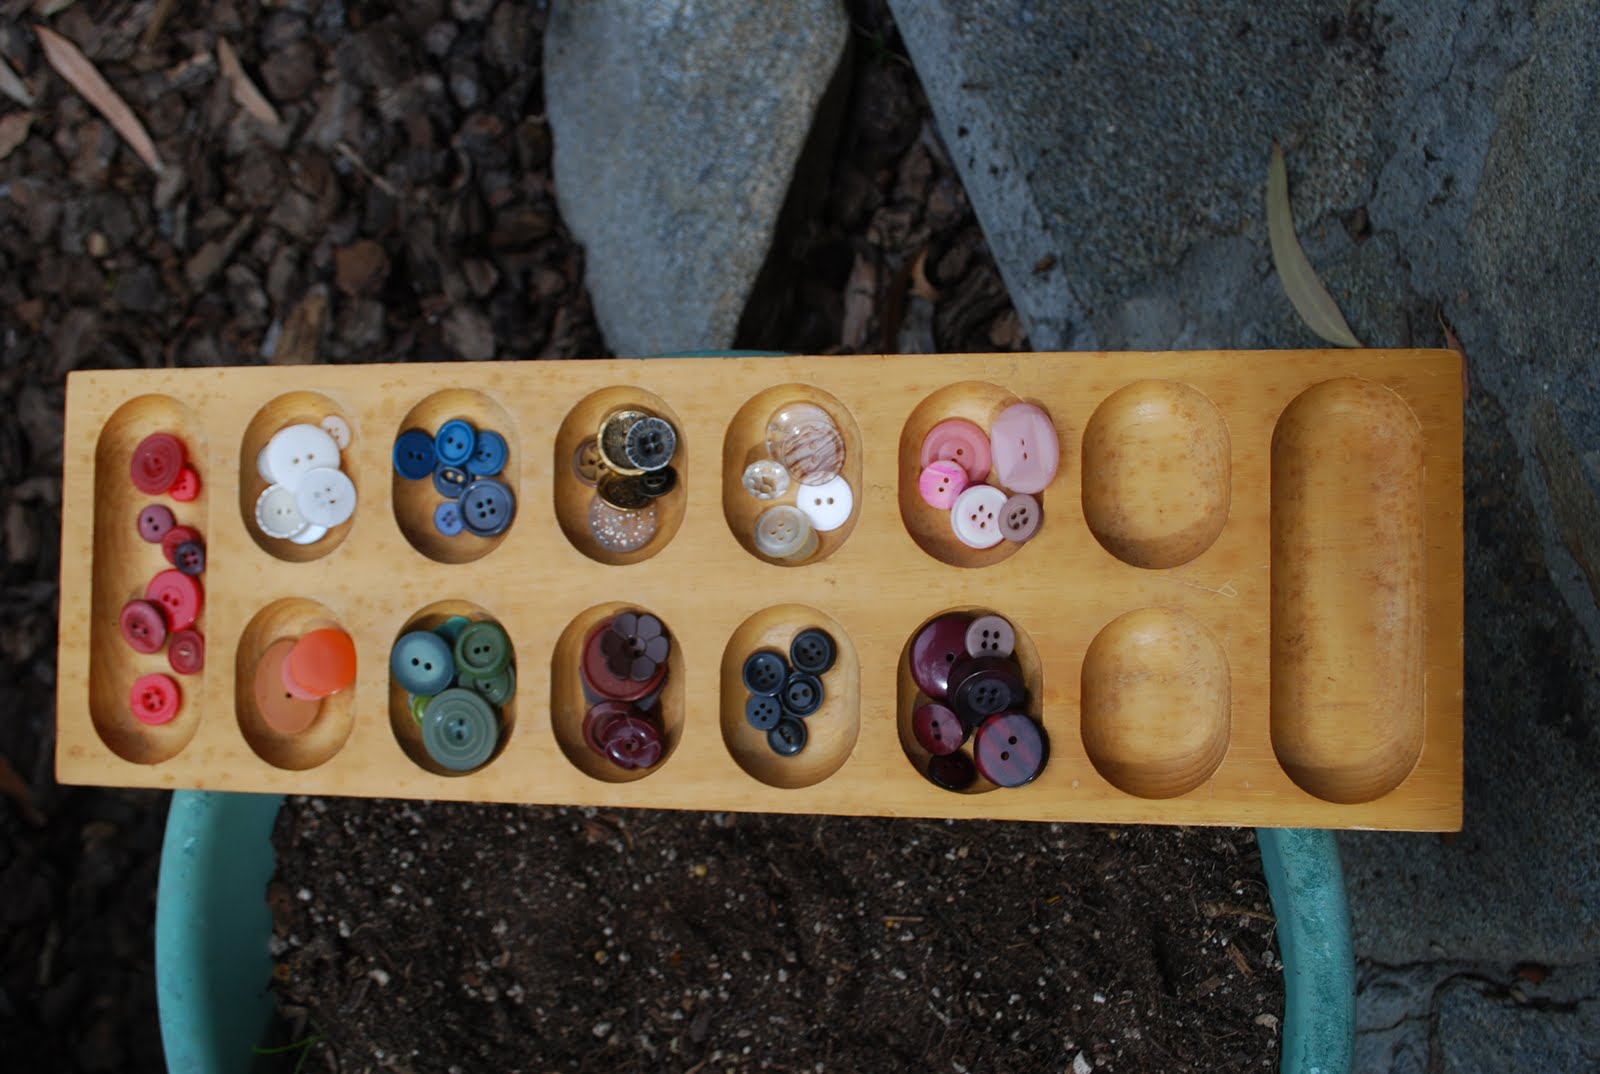
* Sorting game bugs or buttons
• LOOK THROUGH CABINETS GET PICTURES OF EVERYTHING FOR LABELING
• Someone needs to take pics of objects on trays- print- and use sentence strips- someone with nice writing
• Small binoculars upstairs on loft attached with yarn or string. (99 cent store?)[ EVERYONE BRING A PAIR IF POSSIBLE]

• Plastic insects set up a terrarium or two for play exploration
Please “REPLY TO ALL” and keep me in the loop with all emails so I can stay up to date with your progress and ideas.
Include the Base Donations Letter along with the specific Donations Letter for the unit you are working on


 Our Gravitiy, Inertia, Propolsion Testing
 I created this out of cardboard packing material
 We have a basket at the bottom and a bucket connected to a pulley system that takes the bucket up to the loft
 The boxes you see on the side actually create an air vortex by pointing the side with the hole in it at the Styrofoam cups you can hit the sides of the box and shoot the air out in a direct path or vortex and knock down the cups. The wood stand is there for the children to place a box on and aim at the cups.
 The wood stand is there for aiming you can actually aim at certain cups etc.
I made a wind tunnel. Using packing material and the clear sheets you use for an overhead projector taped together. I then bought a fan from Walmart turned it facing up and now we have an awesome wind tunnel.
The wood stand is there for aiming you can actually aim at certain cups etc.
I made a wind tunnel. Using packing material and the clear sheets you use for an overhead projector taped together. I then bought a fan from Walmart turned it facing up and now we have an awesome wind tunnel.


 I also made another type of wind tunnel learn how I made it here


